Just to let everyone know that I am still alive and kicking and still knitting!
I have now finished my second aran cardigan and at last I have started an aran jumper for myself. I was hoping to have it finished in time for Christmas, but unfortunately, life got in the way LOL, like appointments of one kind and another and decorating two Christmas cakes!
When I have finished with the knitting I will get back to tatted tiaras and headdresses etc..
Saturday 18 December 2010
Thursday 25 November 2010
Tiaras assembled


While I'm waiting for my new wool to arrive I thought I would finish off a couple of tiaras.
I have attached the tatting to the headband using fine jewellery wire. The left one I added pearl beads at the same time. This could also be done for the one on the right and I think it would benefit from it....what do you think?
After I had assembled the tiaras I felt that they were not stiff enough - I had used "Fraycheck" - and so I dipped the tatting in full strength PVA glue, wiped off the excess with a damp cloth and reshaped the tatting by moulding them against curmpled alluminium foil. The stiffness is now perfect!
Tuesday 23 November 2010
Christmas knitting

My tatting is on hold at the moment as I am now concentrating on knitting presents for Christmas.
The cardigan shown is one I have just done (it took me 10 days to complete....it would have been less, but I had to wait for the zip) and did not have pockets in the pattern so I made up my own. What use is a jacket without pockets! This cardy is acutally a birthday present for our best friend, Allan's, 65th, which is only 4 days before Christmas!
I won't be able to start my next garment until Thursday.....that is when my next lot of wool will arrive. I use 4 ply cone wool and put two strands together to make double knitting weight and three strands together for Aran weight. I find this much better than buying wool of the actual weight, especially if it is acrylic. It produces a much tighter knit and keeps its shape wash after wash. I also use smaller needles and adjust the stitch count for the tension. With the cardy just done it was three strands of different colours, dark brown, camel and beige, which made an interesting tweed look.
Wednesday 10 November 2010
Bridesmaid - first design

Here is the first little headdress completed. I think that I will design a certain amount of 3D flowers and then show how they can be arranged in different ways.
How does this sound?
Tuesday 9 November 2010
Project "Tiara" started!
Following the request to make a Tiara pattern book, I have made a start on the designs.
The creamier colour is a size 20 thread and 4mm pearl beads and the one in the top left of the picture is done with a perle size 12 and tiny beads with a silver centre.

I have now soaked the pieces of tatting in a stiffening solution and when they are dry I will attach them each to a headband.
The new book will also contain headdresses/fascinators and corsages. The first one is almost ready to assemble. I will post a pic when it is done.
Friday 29 October 2010
Another Doodle
Here is another doodle. This is a combination of the recent doily and the last motif.
This has been done in Coates size 70 thread and measures 5.5 inches (14cm)

Thursday 28 October 2010
Tiaras and Headdresses?
Lily, a fellow tatter, sent me an email today asking me if I would consider doing a book on tiaras and the like. What do you think? Would any of you tatters, out in cyberland, be interested in this type of pattern book?
If I get a good response I would certainly like to do this. I could also accompany the book with a CD on how to assemble the 3D flowers into fascinators and corsages.
I await your response in aniticipation!
If I get a good response I would certainly like to do this. I could also accompany the book with a CD on how to assemble the 3D flowers into fascinators and corsages.
I await your response in aniticipation!
Wednesday 27 October 2010
Motif doodle

Have shuttle will travel!
This is the result of just picking up my shuttle and starting to tat, with no particular idea of where it was going to take me.
I quite like this one and think it will look well on my Christmas tree. I think I will do it in sparkly threads and beads next.
Bandwidth exceeded!
Well! After all the cafuffle of getting my web site up and working, I have now exceeded my bandwidth for this month!
This does not normally happen to me, but because I kept trying, on several occassions, to upload my edited web site files, it was all registering as traffic.
I think everything will go back to normal in November, but if anyone would like to purchase any of my books before then, please contact me by email.
Monday 25 October 2010
Web Site Up and Running!
At last my web site is back to normal. A close family friend sorted it all out for me, in seconds, after I had been trying for days! You wouldn't believe that just one click could make such a difference!
My new book Tatted Flowers From Bulbs is now listed on my web site and there is a link on the right side bar in the Items For Sale.
I have inlcuded a picture of our friend's little girl, Imogen Rose, who is nearly three years old. Old friends of my blog will remember me blogging about her birth and her Christening
She is fearlessly lying on the observation glass at the top of Blackpool Tower. Blackpool Tower is a smaller version of the Eifel Tower in Paris.
Saturday 23 October 2010
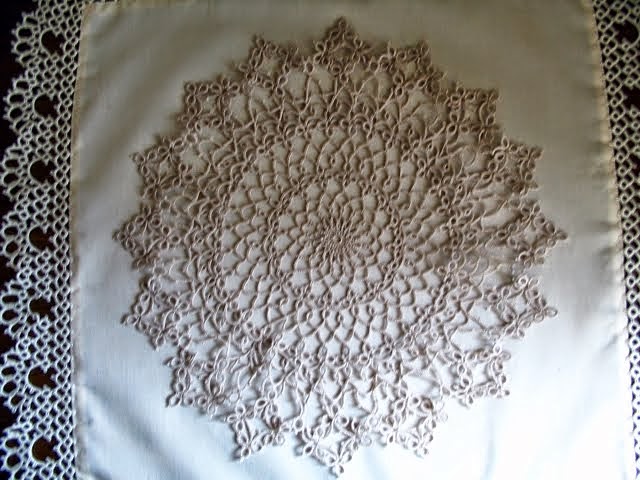
Coronet Doily - Small Version

I have been playing with the Coronet Doily pattern and have come up with a smaller version. (It will look better when I have pressed it, but I wanted to get it posted on my blog!) It can be made in conjunction with the full sized one, like a dressing table set, or just on its own as a coaster or ornament mat. I will write out the pattern as soon as I get a moment.
Clyde is hoping to finish test-tatting the large doily by this weekend. As soon as he gives me the go ahead, I will publish the pattern.
Here is the link now for the pattern.
Friday 22 October 2010
Tatted Flowers From Bulbs

Although my web site is still not up and running again yet, I thought you might like to see a little of the new book.
Kirsty Anear, from Intatters, has very kindly offered to help me sort out my web site. I don't know what I would do without her, she is an absolute treasure!
In the meantime, if you would like to purchase this ebook (PDF format) £6, just email me here for details.


Thursday 21 October 2010
Web Site down!
Just to let everyone know that my web site is down at the moment!
Since I broke my old laptop and bought a new one with the latest version of Microsoft Publisher, I have discovered that the new program does not have the web site publishing feature any more! It will allow me to edit old files, but the way it saves HTML codes is different from before and I am finding it impossible to upload my edited version (which includes my lates book "Tatted Flowers From Bulbs") to the internet.
If anyone wants to purchase my new book, or any of my other books, until it is all sorted out, please contact me at lindasusandavies@hotmail.co.uk
Friday 15 October 2010
Coronet Doily - Finished!

Well the tatting is finished, just the pattern to write out! It won't be long though, I've only got the last round to complete and then I can send it to Clyde to test tat. (What a star he is!)
As soon as Clyde has checked the pattern, I shall put a link to the PDF, here on my blog.
Here we go, the link is now here.
Here we go, the link is now here.
Wednesday 13 October 2010
Coronet Doily - Nearly there!

Nearly done!
The new stitch count is working out very well as can be seen from the picture.
I am getting on well with the written instructions as well. Just the last round that is complicated to write out. Although I will include good digital close-ups I think it will also need a diagram to get my explanation across!
Each point of the coronet starts in a backwards direction and may be consfusing to tat just by looking at the picture.
Clyde has very kindly agreed to test tat the pattern for me, and I shall definitely be taking him up on this. I hope he will still be by friend afterwards! LOL!!!
Monday 11 October 2010
Second version of Coronet Doily

Here, as promised, is a picture of the edited version (so far) of my new doily. It is lying flat much better already. You wouldn't think that just reducing each ring and chain by 2 stitches would make such a difference, but I suppose, when there are 96 rings and 32 chains in the round, it is definitely going to make an impact!
I have decided to call it Coronet Doily.
I knew when I purchased this Finca thread that the pink colour was my best friend's favourite and so Janet will be the recipient of the doily when it is finished.
Friday 8 October 2010
First version finished
Here is the finished result of the first attempt.
Now that it is done I can see where there are too many stitches to allow it to lie flat. Even with wetting, blocking and pressing it does not sit well.
I am really looking forward to getting it right as I think it will then be a pretty doily.
I have used split chains and split rings to climb out of each row and therefore there is only one cut and hide ends at the very end!
Thank you to all who have suggested a name for this doily.
Friday 1 October 2010
Not quite right yet!

I like the design, but the stitch count is not right yet. I will complete this one as it is and then do another edited version.
I have no idea how I am going to write this pattern out, as I have made the outside row really complicated. I shall have to ask Clyde to test tat it for me and give me his opinion on how to simplify it!
I also need some suggestions on a name for it?
Monday 27 September 2010
Break from new book designing
I have decided to take a break from working on my latest book, Tatted Flowers From Bulbs. I had not picked up a tatting shuttle since before Howard and Charlie's wedding on 4th September, until last Saturday.
I loaded two shuttles, had no idea where they were going to take me, but this is the result so far!

I will post more pictures as it grows!

Thursday 9 September 2010
Wonderful Wedding
I can't believe that our big day has come and gone in a flash! It was 18 months in the planning and one day in the performance! Never-the-less it was the most beautiful day (including the weather!), everything went according to plan with no major disasters, and a great time was had by all.
I think you will agree that Charlie (short for Charlotte) was a beautiful bride. Her tatted headdress showed up fantastically against her dark hair. Those of you who have followed my blog will know that Charlie has battled breast cancer and the pictures show how much her hair has grown in a short space of time! I think you will also agree that she looks a picture of health now, thanks to modern medicine, and her own inimitable determination to be recovered in time for her wedding day. Her only disappointment was that she could not wear her wedding veil that I had made with the beaded tatted edge, her hair was too short and too fine to hold it in place. I edged it with hens and chicks design, which I had also done on the tiers of the wedding cake to match it.


I think you will agree that Charlie (short for Charlotte) was a beautiful bride. Her tatted headdress showed up fantastically against her dark hair. Those of you who have followed my blog will know that Charlie has battled breast cancer and the pictures show how much her hair has grown in a short space of time! I think you will also agree that she looks a picture of health now, thanks to modern medicine, and her own inimitable determination to be recovered in time for her wedding day. Her only disappointment was that she could not wear her wedding veil that I had made with the beaded tatted edge, her hair was too short and too fine to hold it in place. I edged it with hens and chicks design, which I had also done on the tiers of the wedding cake to match it.


The caterers had assembled the cake by the time we arrived at the reception. The tiers were supposed to be sitting directly one on top of the other, but as it looked so nice the way they had done it, we left it as it was!
Wednesday 25 August 2010
Starting again
I have my new laptop and I have made a start on re-doing my book Tatted Flowers From Bulbs. Fortunately Jeff Hamilton kindly sent me 3 of my patterns on PDF that he had test tatted for me and so I have been able to just copy and paste these three....only about another 6 to go....but of course this time I have to type out the whole patterns and re-do the pictures!
Not long now to the big day! I tried on my whole ensemble the other day, but I did not like it! I have decided to wear something completely different, the prerogative of the mother of the groom to change her mind! That's my excuse and I'm sticking to it! LOL
AND I have had my hair cut short....it was down as far as my shoulder blades! I've gone for a whole new look!
Tuesday 17 August 2010
Laptop Distaster!
Sunday evening I DROPPED MY LAPTOP onto the patio and it is completely kaput! When we took the hard drives out to recover my files, one was OK, but the one with all my important files on was completely unsalvageable!
I have all my books on back-up disks, but not my latest book, Flowers From Bulbs. It was very nearly finished and now I will have to start all over again! It's a salutary lesson. In future I will back-up much more frequently.
All my new video files are gone, that is something else that I will have to start again!
Many of my latest tatting pictures are gone, but I can recover several of them from my free pattern PDF files, as they are hosted on the internet.
So, my dear friends, learn from my mistakes, and make sure you back-up your important files regularly!
Thursday 5 August 2010
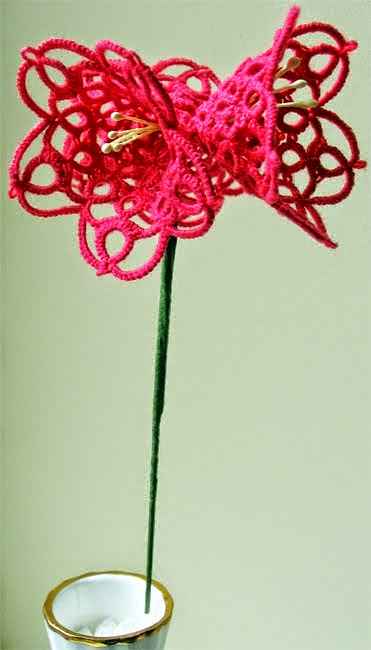
Amaryllis -New Stem

Following advice from the comments on my previous post of my Amaryllis, I have put three thick wires together and encapsulated them with tatting. I hope the finished item meets with my critics' approval LOL!
Leaves for the bulb flowers

No flower is complete without it's leaves and so I have done a set of leaves for my new flowers. they are all variations on a theme, as I find most leaves for the bulb flowers tend to be thin with varying lengths. The tulip and amaryllis are not as thin, but still very similar in design.
Sunday 1 August 2010
Amaryllis - completed!
I have now finished off the Amaryllis.
I have wired it using 24 and 18 gauge green coated wires and yellow stamens. I get the wire and the stamens from my local sugarcraft shops.....or you may know them better as cake decorating stores.
My next job is to write out the instructions to make up the Amaryllis and then to check through all the patterns carefully.
When I have done that the new book "Tatted Flowers From Bulbs" will be ready to put on my web site.
Thursday 29 July 2010
Amarllyis and Cross Bookmarks

This Amaryllis is the last flower for my latest book Tatted Flowers From Bulbs. I have yet to wire and assemble it, but I think you can see the shape appearing. Amazingly, I designed it very quickly, with only one alteration, from my hospital bed. My brain must have been boosted with the blood transfusion I had following my surgery!LOL

These two bookmarks are the ones that I designed whilst I was in hospital. They are similar....variations on a theme. It was just something to do after I had finished the amrylis flower above. Really good therapy.....when I am concentrating on designing I do not concentrate on pain!
Monday 26 July 2010
I'm back!
At last, I managed to do the stairs and so was allowed home from hospital this morning! It is so lovely to be able to sit in my own chair in my own living room.
I will post a picture of the new amarylis when I get around to photographing it. Then of course, I will have to write out the pattern! 'Moan'
I will post a picture of the new amarylis when I get around to photographing it. Then of course, I will have to write out the pattern! 'Moan'
Friday 23 July 2010
doing well
It's been a while since my last post as I am still in hospital following spinal surgery. The sugery went well but my progress is muh slower than expected. I'm doing fine, just not quick enough for me LOL! Yesterday and today I have been designing an amarylis to put into the new boo k. I am very pleased with my efforts and will write the pattern out when I get home. Unfortunately I cannot upload the pic I took on my phone, will that from home.
Saturday 3 July 2010
Iris re-taped


Here we go again, another slight alteration. Following advice from Barb from HBT I took the flower apart (not a difficult job) and re-assembled it so that it was closer together at the base. Barb was absolutely right....it does look much better.
I would just like to take this opportunity to thank all my followers who have given me encouragment and advice on all the patterns that I do. Your constructive criticism is extremely helpful!
Thursday 1 July 2010
Edited Iris

 Following the helpful comments I got from the first Iris post, I have made each petal broader, giving, I think, a more natural shape to the flower.
What do you think?
Saturday 19 June 2010
Tatted Iris


Here is the iris that I have designed to add to my latest book Tatted Flowers From Bulbs.
Most flower patterns only take me two or three goes to get the effect that I am looking for, but this one!!!!....well I certainly got through a lot of cotton before I was satisfied with the end result!
I think the main problem was, there were so many variety variations of the flower, that coming up with something that actually looked like an iris, but was also easily achievable for the tatter, was quite a challenge!
What do you think? Would you recognise it as an iris?
Friday 4 June 2010
Bulb Flowers So Far
 Here is a picture of the flower patterns that I have done so far, for my new book
 Tatted Flowers From Bulbs.
I think that the next pattern will be one for Iris and then one for Amarylis (maybe LOL!)
Also, I will have to do some leaves, although the pattern that I have done for the hyacynth leaf could simply be elongated for the daffodils and bluebells and just about the same length for the crocuses!
Also, I will have to do some leaves, although the pattern that I have done for the hyacynth leaf could simply be elongated for the daffodils and bluebells and just about the same length for the crocuses!
Thursday 27 May 2010
My own fascinator

I have designed and made my own fascinator, for my hair, that I shall wear to my son' wedding in September.
The turquoise is an exact colour match to my dress and my accessories are black.
Friday 7 May 2010
Still here!
Just to let everyone know that I am still here in the background.
My back is too painful for me to sit and tat at the moment, and I am still concentrating on finishing the sugarcraft roses for my son's and futuer DIL's wedding cake, whenever I feel up to sitting long enough, that is!
Everything else has been put on hold at the moment. I am on the waiting list for my spinal surgery.....have been on the 6 months waiting list for 12 weeks....but I am classed as urgent and so could be slotted in at any time. I hope it will be soon so that I can recover in plenty of time for the wedding in September!
Saturday 17 April 2010


Thursday 15 April 2010
Roses - completed
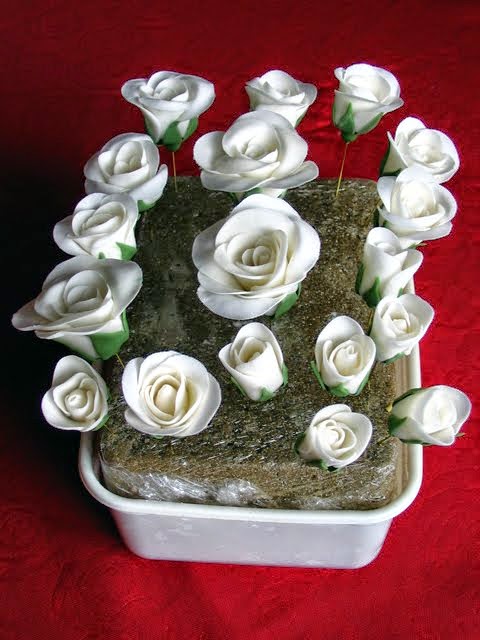

 These are the three sizes of roses that I have decided on for my design of the cake. The only thing that I have to do to them is to dust them with shiny, ivory petal dust, but I won't do this until they are very dry and hard. Now then, back to the next 3 dozen roses! LOL.
 I cannot do any more to the cake as it is far too soon. Although rich fruit cake keeps for years, the marzipan colour can leach into the icing if it is done too soon. I always use the natural marzipan instead of the yellow, which helps to minimise this leaching, but I won't take any chances!
Wednesday 14 April 2010
Roses - next stage

In this picture I have put three different sizes of the roses, so that you can see how they develope. When I am happy with the size and shape......each rose seems to develope a character all of its own - rarely are two exactly the same.....I finish them off with a green calyx and seed pod. I will post a picture to show the finished flowers.
Tuesday 13 April 2010
Wedding Cake Roses
 I have not done any tatting for a while now for two main reasons.
One: I have had to travel long distances to see a professor about my back problem and:
Two: I am now in the throws of making my son's wedding cake flowers. The rich fruit cake is already made and maturing nicely. I made it with a half bottle of brandy in the mix, so it should be well matured by the time the wedding comes along in September!
Charlie's bouquet is going to be roses and so she wants roses on the cake.

I start with making a teardrop shaped bud on a wire (as you can see in the first picture). I made 6 dozen centre buds! I then add each petal individually. So far I have done 3 dozen with 4 petals each. Some will stay as tight buds, the others will grow into larger flowers the more petals I put on them, and also increasing the petal size.
I will post more pictures as they develope.
Tuesday 30 March 2010
TattingChic's Blogaversary Giveaway
Just in case you haven't heard, Tattingchic is having a prize giveaway for her blog's second anniversay. Why don't you drop by and put in a comment, you could win a lovely prize?
Sunday 28 March 2010
Bridal Headband
 Here, as promised, is a picture of the completed bridal headband that is for my future daughter-in-law's maid of honour.
I have made it with exactly the same flowers, motifs, ribbons and pearl tatting as the bride's headdress, but with less in it, to distinguish between the two. Can't have the bridesmaid upstaging the bride, now can we? LOL
Subscribe to:
Posts (Atom)
